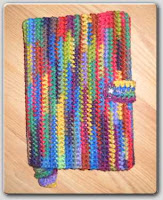
E-Reader Carry Case
By Sue Usiatynski
Materials:
3 colors of worsted weight yarn
A: 3.5 oz
B: .25 oz
C: .25 oz
I hook
Yarn needle
Stitch marker
Button
Size:
9” wide, 6” high
Abbreviations:
beg = beginning
ch = chain
Rnd = round
sc = single crochet
sl st = slip stitch
YO = yarn over
Special stitches:
Single spike st: insert hook 1 row below the row where next st would normally go, YO, pull up loop, YO, pull through 2 loops on hook.
Double spike st: insert hook 2 rows below the row where next st would normally go, YO, pull up loop, YO, pull through 2 loops on hook.
Triple spike st: insert hook 3 rows below the row where next st would normally go, YO, pull up loop, YO, pull through 2 loops on hook.
Spike st group: single spike st, double spike st, triple spike st, double spike st, single spike st.
Case body:
This part of the pattern is worked in continuous rounds. Place a stitch marker in the 1st stitch of each round.
With color A: ch 31
Rnd 1: 2sc in 2nd ch from hook, sc in next 28 ch, 4sc in last ch, now working on unused side of beg ch sc in next 28 ch, 2sc in last ch. (64 sc)
Rnd 2: sc in 1st st, 2sc in next st, sc in next 28 st, 2sc in next st, sc in next 2 st, 2sc in next st, sc in next 28 st, 2sc in next st, sc in last st. (68 sc)
Rnd 3-24: sc in 1st st and around. (68 sc)
Finish off, weave in ends.
Flap:
This part is worked in rows.
With color A: ch 27
Row 1: sc in 2nd ch from hook and next 25 ch. This is the wrong side and bottom. (26 sc)
Row 2-4: ch 1, turn, sc in 1st st and across. Row 2 is the right side. Finish off A after Row 4. (26 sc)
Row 5: Attach B to Row 4 with a sc in 1st st [with right side facing you on opposite side from where A finished off], sc in next st, single spike st, (spike st group) 4 times, single spike st, sc in last 2 st. (4 sc, 2 single spike st, 4 spike st groups)
Row 6-9: ch 1, turn, sc in 1st st and across. Finish off B after Row 9. (26 sc)
Row 10: Repeat Row 5 with color C.
Row 11- 14: Repeat Rows 6-9 with color C. Finish off C after Row 14.
Row 15: Repeat Row 5 with color A.
Row 16-19: Repeat Rows 6-9 with color A. Do NOT finish off after Row 19 instead continue on to edging.
Edging:
Still working with color A, ch 1, turn 90° so you are working on the side and sc across side, (sc, ch 1, sc) in corner, now working on unused side of beg ch sc across putting (sc, ch 1, sc) in the corner, sc up the other side, (sc, ch 1, sc) in the corner, working across Row 19 of flap sc in next 12, ch 6 leaving ch unworked as this is the button loop, sc in next 12 putting (sc, ch 1, sc) in the corner, sl st in 1st st. Finish off leaving a long tail for attaching to case.
Strap:
Ch 51 leaving a long tail for attaching to case.
Rnd 1: 2sc in 2nd ch from hook, sc in next 48, 5 sc in last ch, continuing on unused side of beg ch sc in next 48, 3sc in same ch as 1st 2sc, join with sl st in 1st sc. Finish off leaving a long tail for attaching to case. (106 sc)
Assembly:
Whip stitch flap to case along Row 19 between st 40 and 66. Sew straps to case on both sides of flap with 2 st between flap and strap. Weave in ends. Attach button to case behind where button loop meets case.


